

Amazon Web Service (AWS) is a secure on-demand cloud computing platform provided by Amazon. WordPress hosting in AWS cloud server runs super fast and Deploy WordPress website in AWS EC2 via amazon AWS marketplace VM images is easy.
About Amazon Web Services (AWS)
Aws offers Cloud server, CDN Service, DNS Management, Database Storage, AI, Machine Learning, IoT, Developer Tools and other most important functionality to help individuals and large companies to scale and grow their business.
Aws allows you to easily Deploy WordPress website in the AWS EC2 cloud server. Hosting a WordPress website is easy on AWS platform.
With AWS you can deploy the specific solution you need, and only pay for exactly what services you use, resulting in lower cost and speed up your work. Aws has large numbers of cloud computing, tools, and services. further, we are not going to discuss every service, rather than just learn service which requires Hosting WordPress in AWS.
Why Install WordPress on Amazon AWS
1. EC2 (Elastic Compute Cloud) – these are just the Virtual Cloud server in the cloud on which you have to install WordPress image. You can customize Ram, CPU, and Storage in this Virtual Machine at the time Installation.
2. Storage (EBS) – it is a virtual storage hdd that you install WordPress on your cloud server. You all data is backed up to AWS EBSstorage service.
3. Key-Pairs – key-pairs are how you can connect to AWS EC2 cloud server instance via secure shell (SSH).
4. Public Ip – public IP is ip4 address. However, once your virtual server instance is running, you can now check your WordPress website using this IP address.
5. Region – most important is the region because you can’t change after Hosting WordPress on AWS. In simple words, A region is a geographical area. Each region has two or more data centers. You can deploy your WordPress website to your favorite location.
Related: Create SSL Certificate in AWS Free.
Deploy WordPress on Amazon AWS EC2 (AWS) Free
This Hosting WordPress in Aws Ec2 Guide will help you to deploy your wordpress website free for 1 year completely which is cost you more than $50 with other service providers.

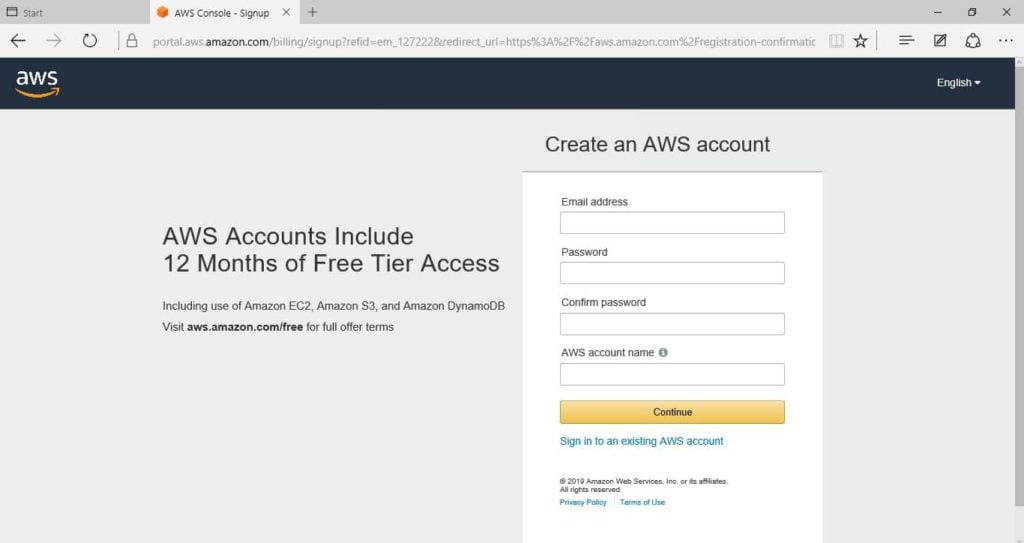
1. Create An AWS Account
First, the important thing is to create an AWS Account. You can create one by following this link. In this process, you have to provide a credit card or international Debit card and a phone number on which is part of the online verification process as per their terms and policy. Your card will be charged lower than $2 for verification. After verification, your money will be refunded to the card.
You will need a current Amazon account to log in and sign up. To build it, follow these steps:
- Go to http://aws.amazon.com and tap on the “Create an AWS account” button at the top of the page.
- On the next page, write an email address, a password, and an AWS user account name. Next, click “Continue” to begin the registration process.

- after you’ve login into Amazon, sign up for AWS web by choosing the account and giving some basic communication data and your mobile phone number.
- Now, continue to the next step by typing your payment information. tap the “Secure Submit” button to proceed with the account creation.

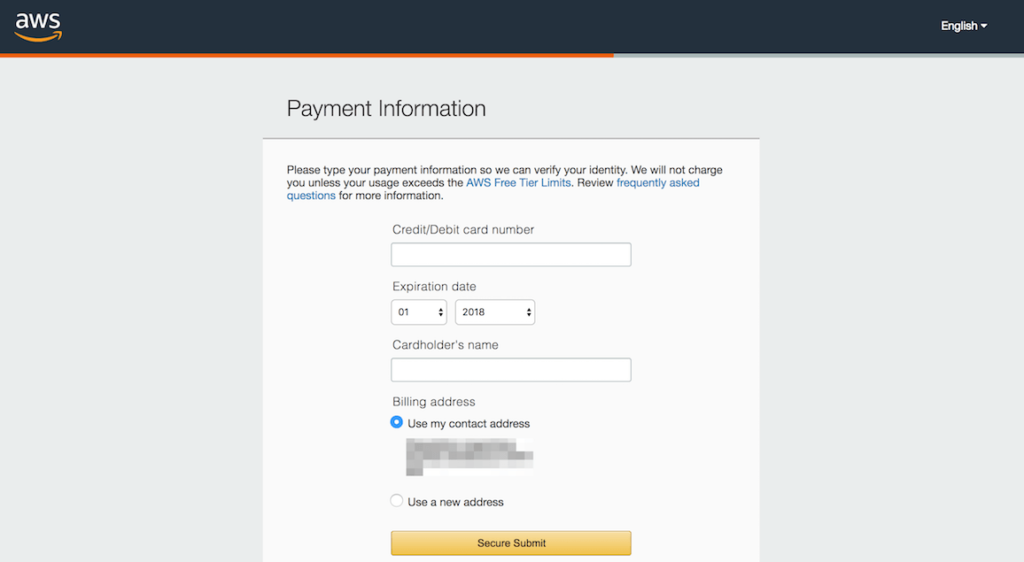
If you are thinking about how much fee you’ll be charged for services, don’t worry. after first sign up for the AWS account, you get free usages of AWS Free Tier services, which gives you 12 months of free subscription of aws popular services. This includes 750 hours of Amazon EC2 microservers, which is good for new website hosting. So long as you use a free tier service, your card will never be charged. However,
2. Go To AWS Marketplace
After sign up, you have so many options but here I will tell you an easy method for hosting WordPress on AWS. Go to Aws Marketplace and Search WordPress.
Aws Marketplace

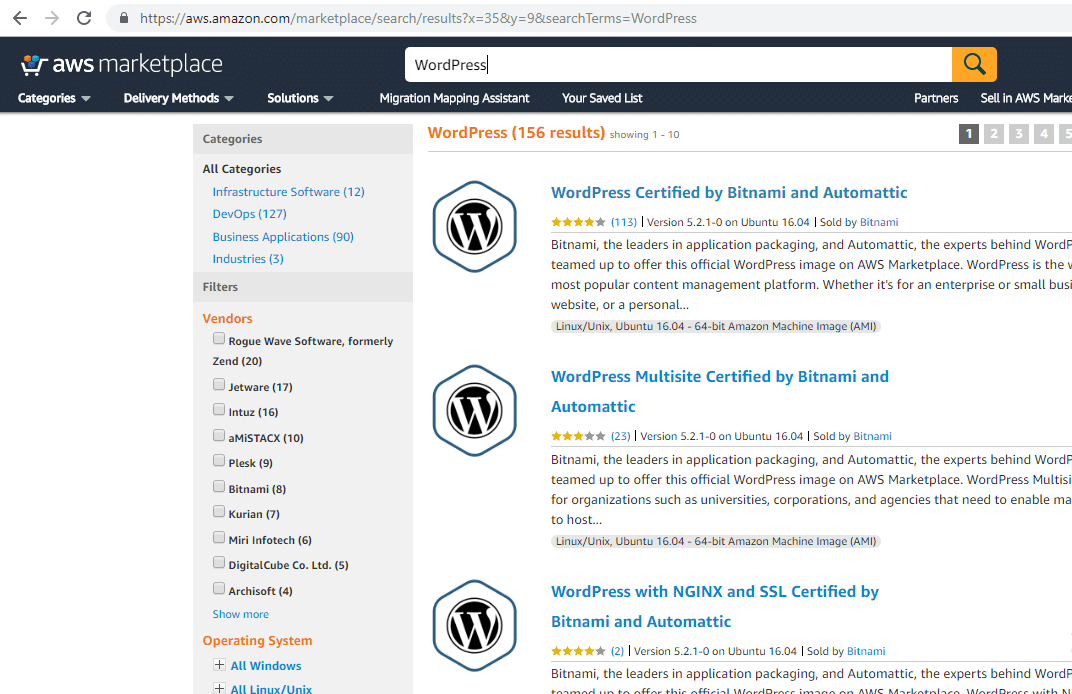
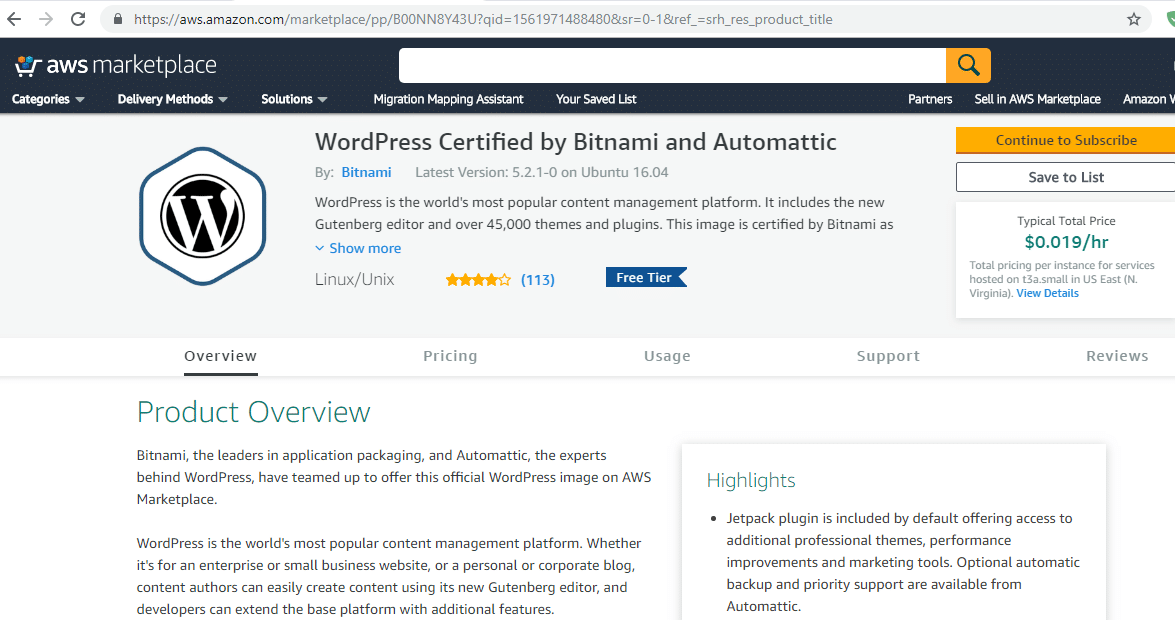
3. Search WordPress and Click on WordPress Certified By Bitnami
Now Click on WordPress certified by Bitnami and Automattic. You will be redirected to this page.

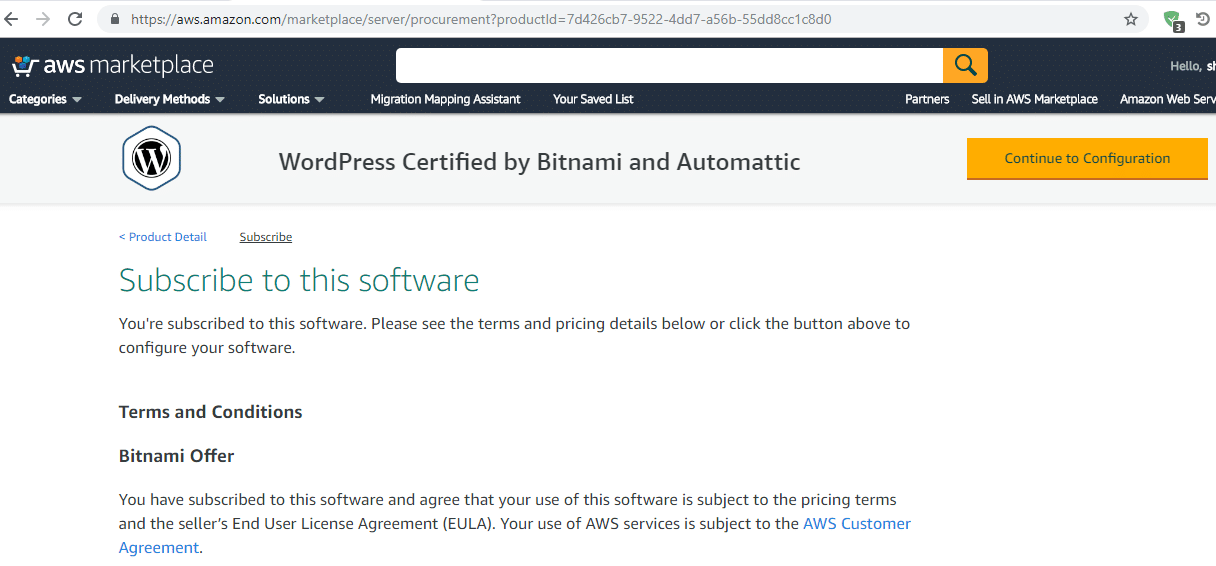
4. Subscribe Software
After that click on the subscribe button. after subscribe now click on the yellow configure button.

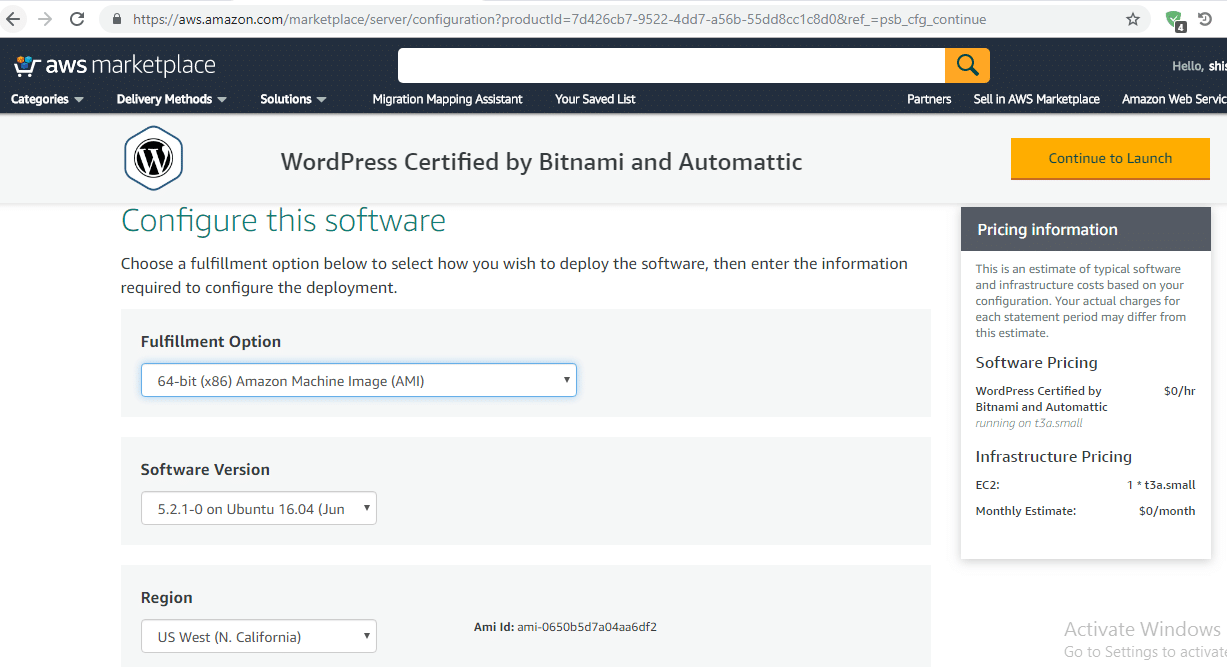
5. Launch Software
Here you will sell software and version and region option. Choose your data center here and click continue to launch.

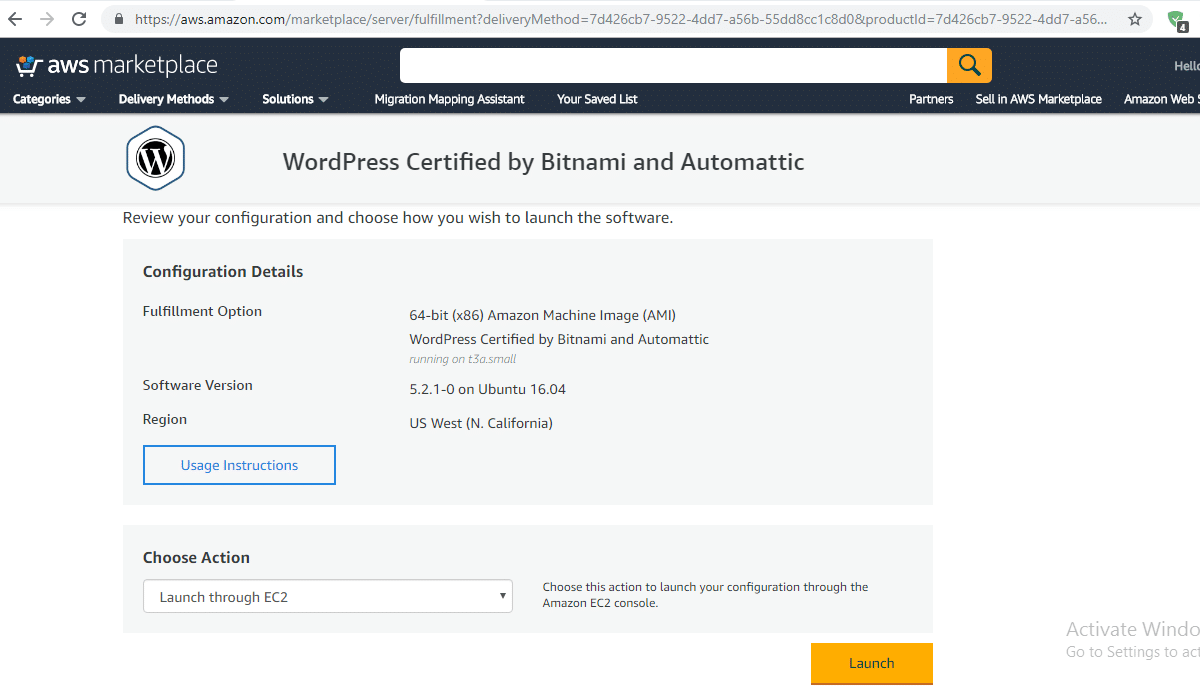
6. Lunch Through EC2
Therefore, we launch this image from ec2. So please choose action Launch through EC2 and click the yellow launch button.

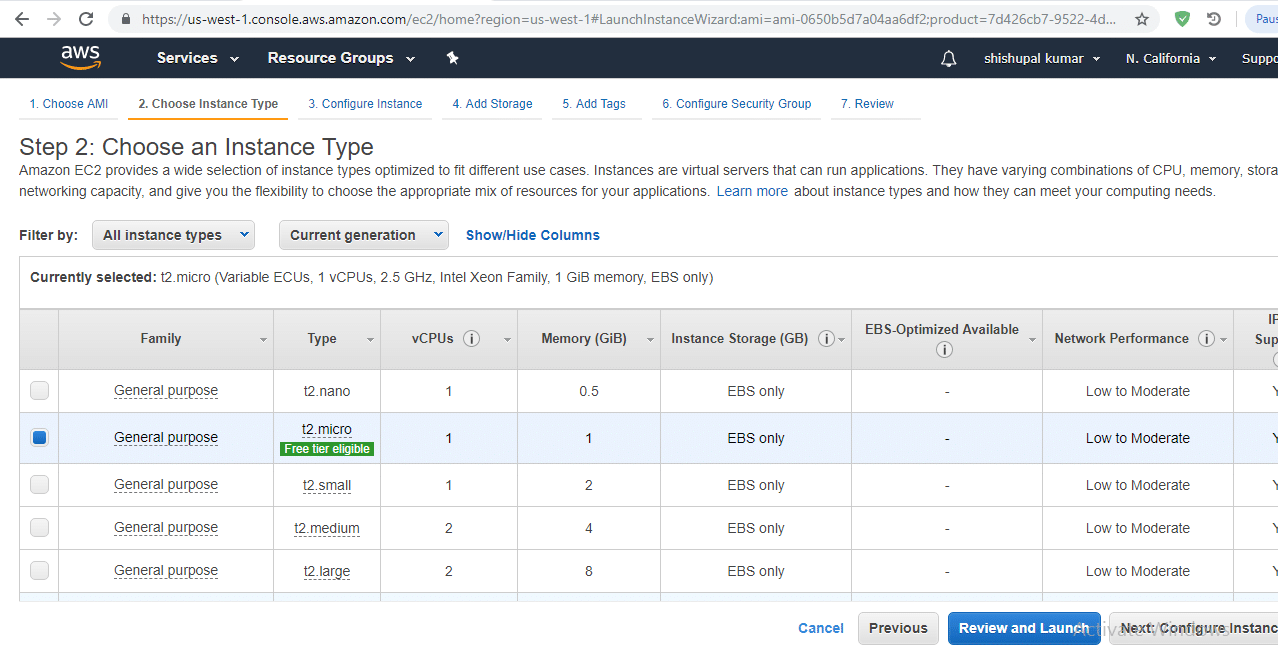
7. Select t2.micro Instance
Now we select t2.micro free tier option and select review and launch. Therefore Simply click the blue launch button.


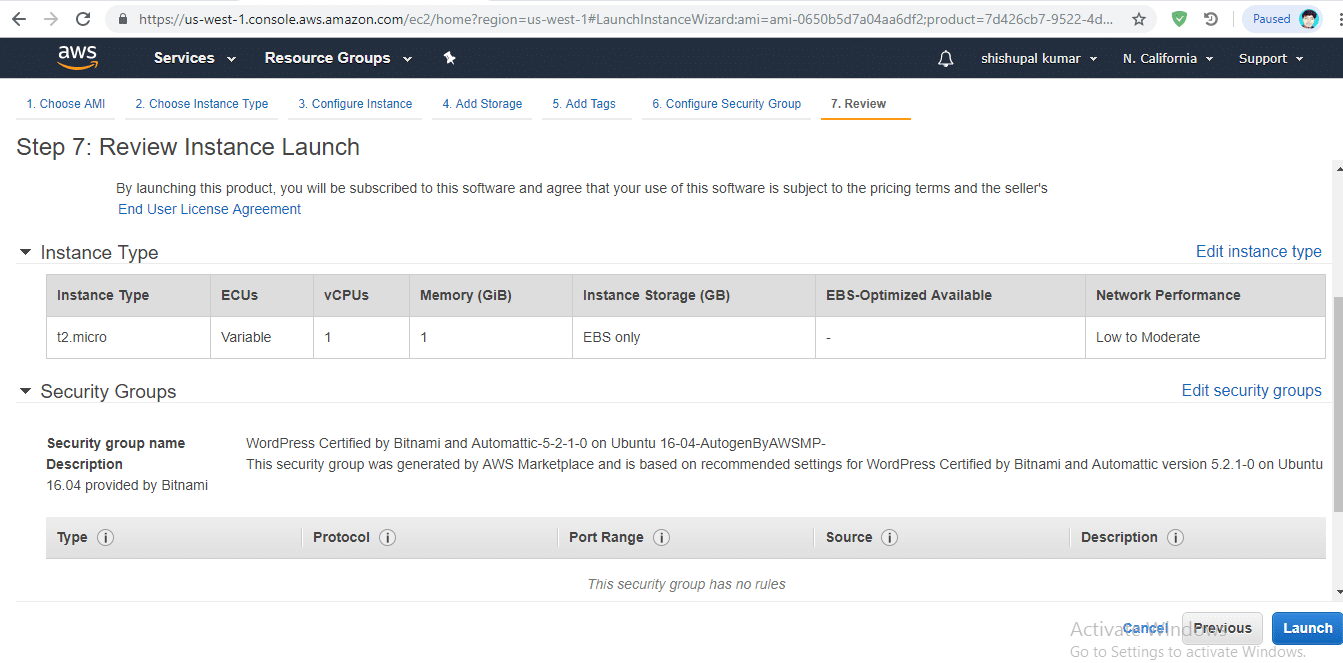
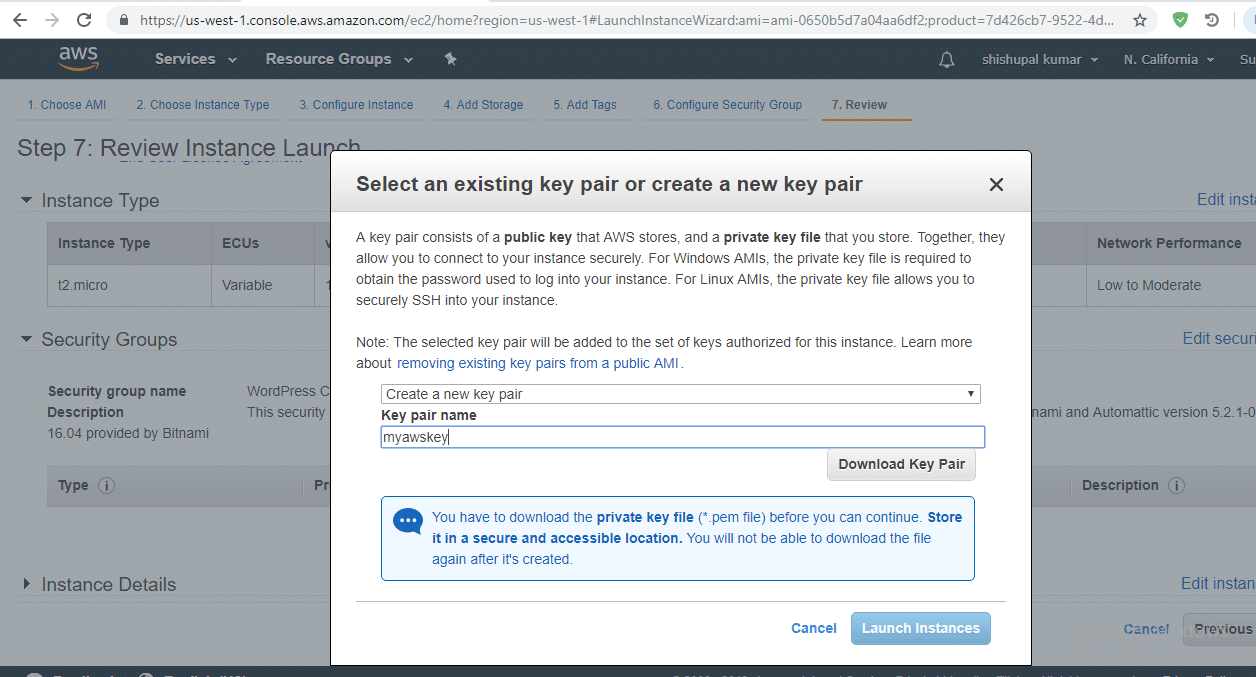
8. Download Key-Pair
Above all, we have to create a key pair for SSH Access and download key pair. Therefore click the Big Blue Launch Instance button.

9. View Instance
WordPress Is now installing in Amazon Ec2. After a complete installation select view instance.

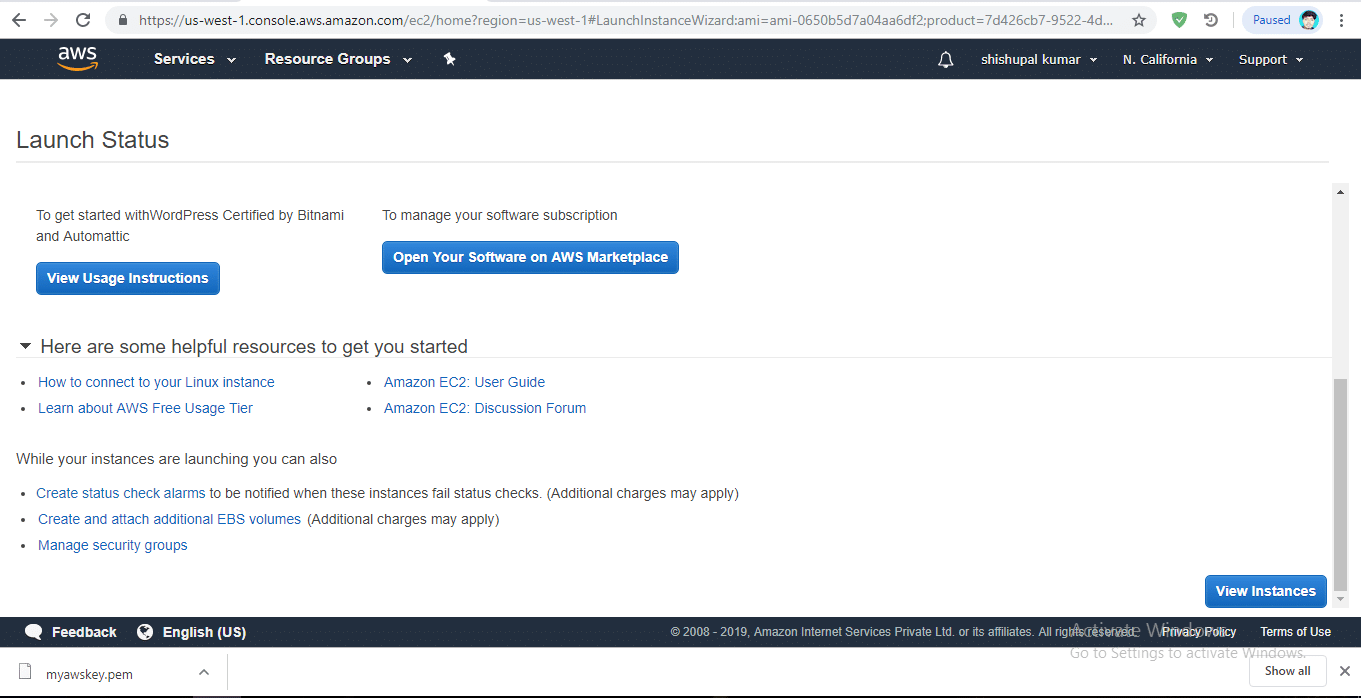
10. Launch Successful
Now we have successfully launched WordPress on Amazon EC2.

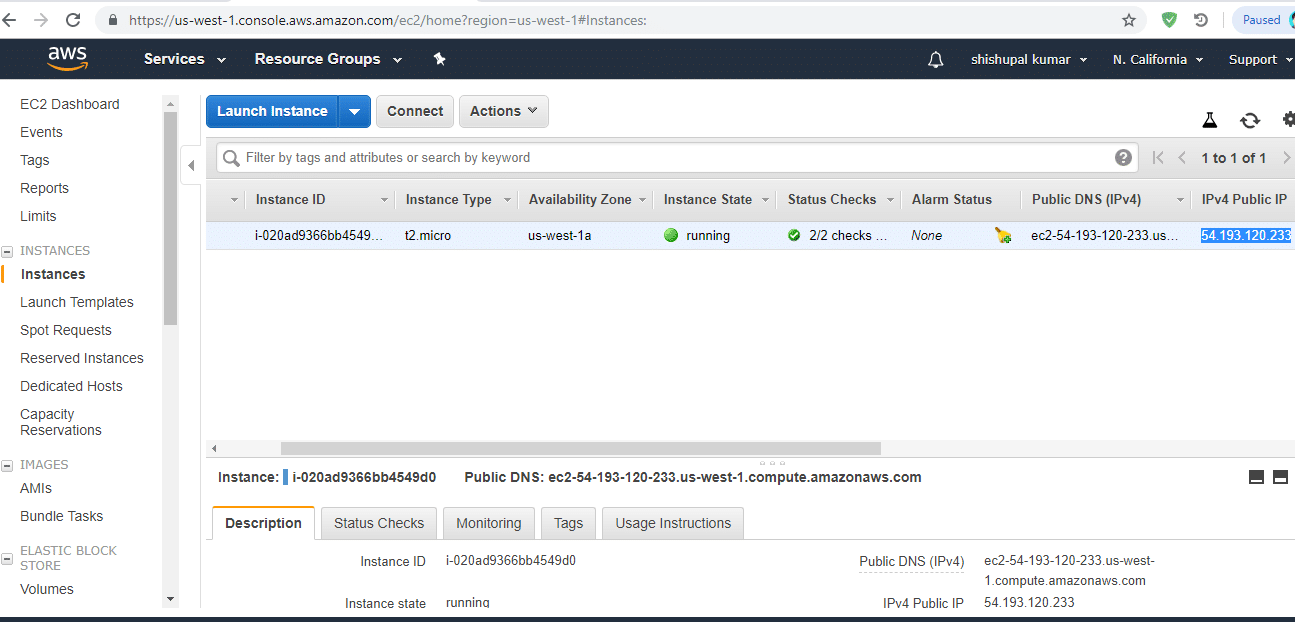
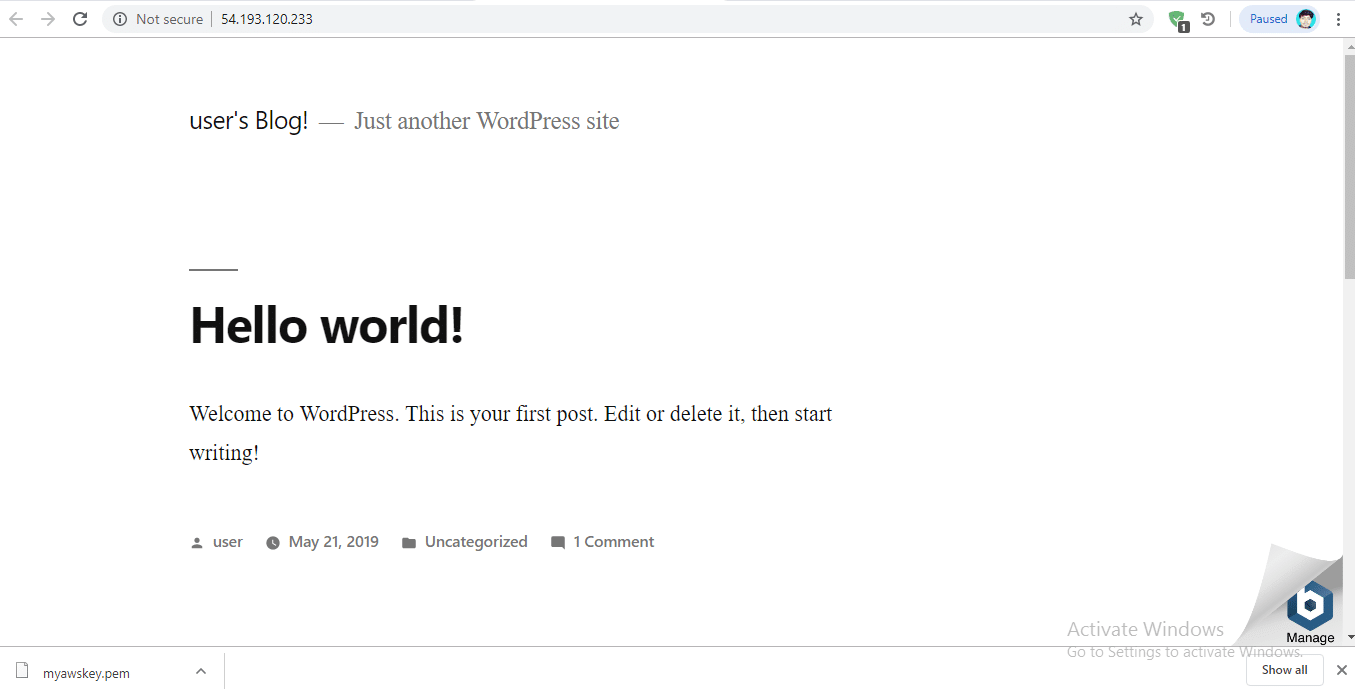
11. Browse WordPress Via IP
It’s time to view our WordPress website. Therefore copy 4 digit IP and paste in browser.

12. Search Username and Password
Get the username and password for this WordPress installation by clicking on Action then instance setting then Get System Log.

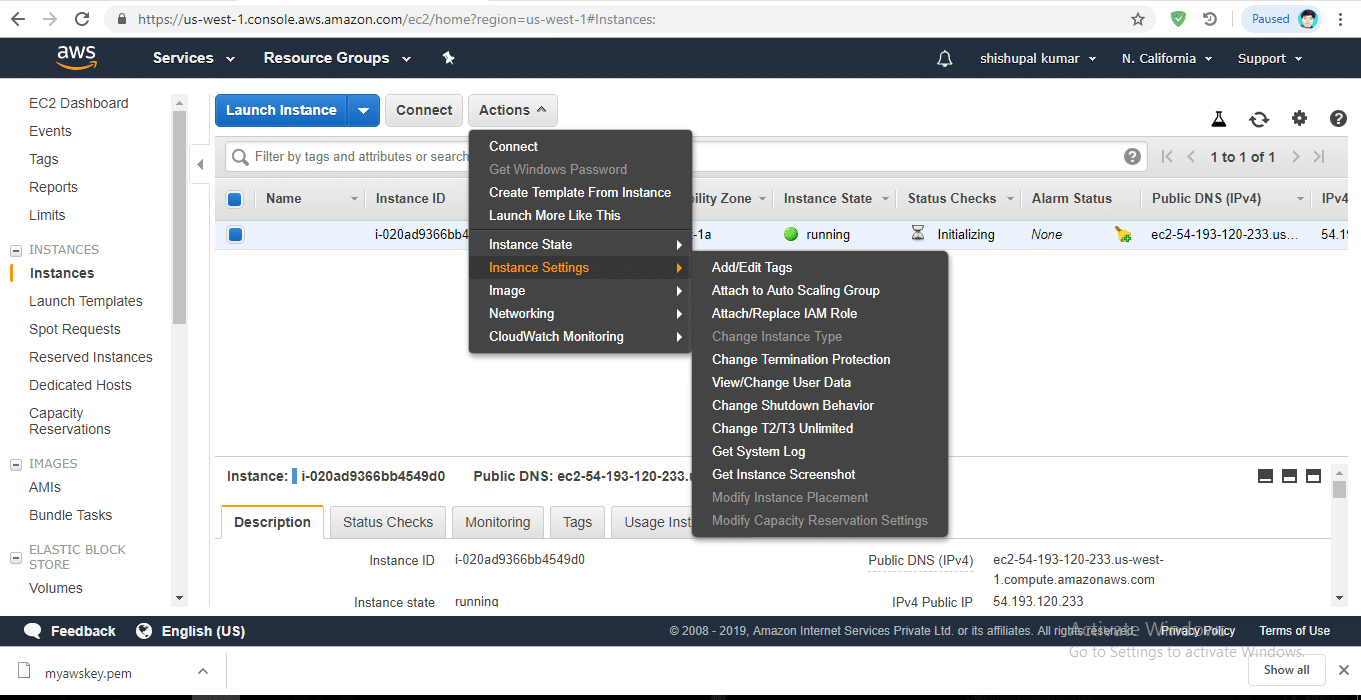
13. Get Credentials
You are almost finished the installation process but, before you can go to the WordPress site, you required to get administrator credentials. go through these steps:
- To obtain the username and password, follow these simple steps:
- Log in to the Amazon AWS Cloud Console.
- If needed, select the region in the top right side to change the other region where your virtual instance was hosted.
- In the left navigation panel, select the menu “Instances -> Instances” item.
- Select your instance in the dashboard.
- From the “Actions” drop-down menu, choose the “Get System Log” menu item.
Here swipe down and check these details.


14. Point IP Address to Domain Name
If you have a domain name from one of these service providers, then tap the link to get specific guidance for pointing your domain name:
- 1&1 IONOS
- 123 Reg
- Bluehost
- Domain.com
- Enom
- GoDaddy
- Google Domains
- OVH
- Namecheap
- Network Solutions
- Register
- Hostgator – HostGator doesn’t allow you to straight control your DNS settings. To perform the required changes to your HostGator domain name, you need to contact their support team and provide them the following instructions:
- set your nameservers to HostGator’s defaults
- disabled all forwarding on your domain
- set your @ domain’s A record to the hosting WordPress on AWS IP address:
23.227.38.32 - point your subdomain’s www CNAME record to the aws hosting IP:
www.example.com

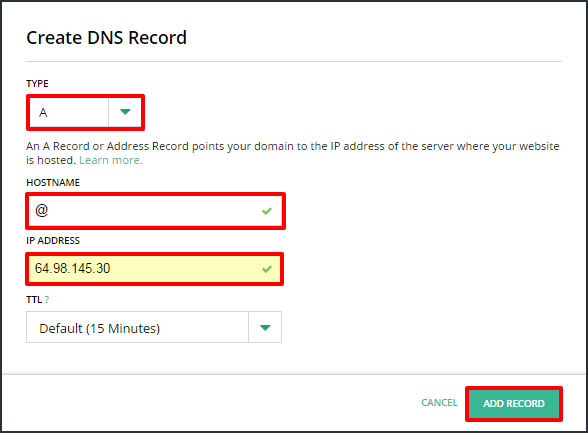
Now Point Ip address to your domain a record. Here is a great article for this. Follow this link.
Related: Hostgator Vs Godaddy: Which is better?
15. Write Your First Post
After Hosting WordPress on AWS, go to your website admin page and log in with username and password.

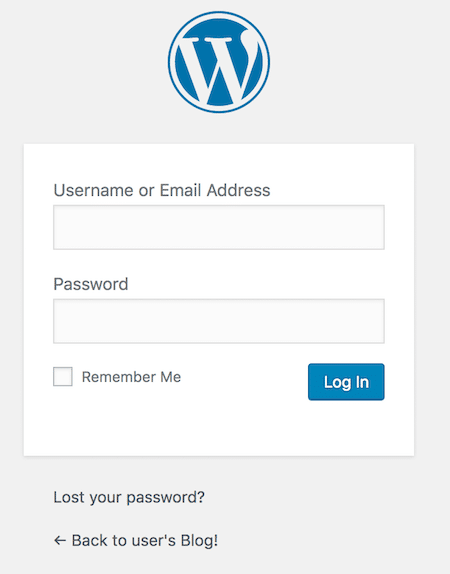
To log in to the WordPress dashboard, follow these steps:
- Go to the WordPress dashboard, normally at the URL http://SERVER-IP/wp-admin.
- Log in with the username and password from the previous step.
Example – yourwebsite.com/wp-admin
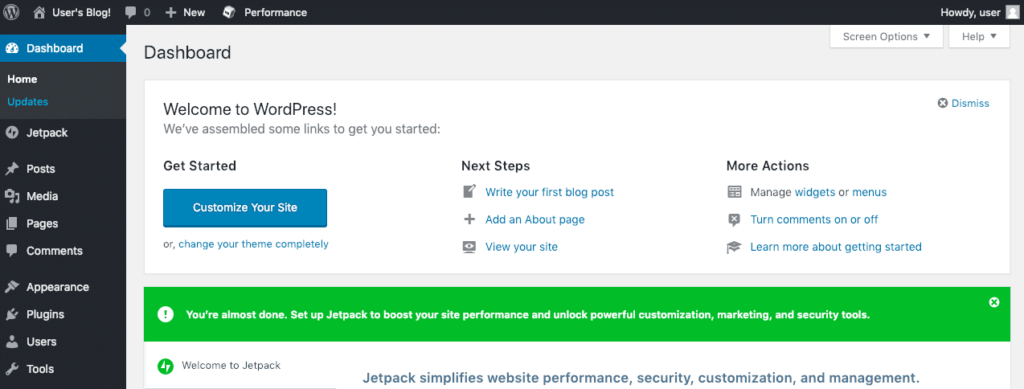
Now we are at the WordPress dashboard, which allows you to control posts, pages, and comments; customize your WordPress site with themes and plugins; import and export content; design navigation menus; add or delete new user accounts; and much more.

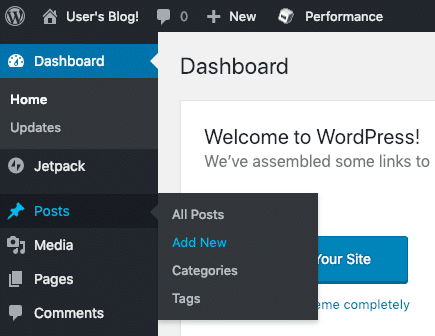
Write Your First Post
You can directly add a new post using the next steps:
Tap the “Posts -> Add New” menu option to create a new post. check the given image here if you are new to WordPress.
- Write a beautiful title and post details for your post. You can apply the formatting tools at the top from the content area to custom design your post and add hyperlinks and images.
- Optionally, pick the format and category for your post.
- Publish it instantly using the “Publish” button.

Well-wishings! You now have own blog in amazon AWS, a fully-functional WordPress blog in the cloud.
Meanwhile, If you want to store your important file cloud, then Google Drive is the best option. Check out How to use google drive.