System Thread Exception Not Handled Error in Windows 10 that would have Blue Screen of Death (BSOD) when Windows Services threads get in critical fault. Many Windows 10,8 and 8.1 users report that they have faced ‘system thread exception not handled error’ in their Microsoft Windows computer. It’s a common error Windows Users get when something goes wrong. One of the common reasons is Stuck in Device Driver in Windows 10 computer, Drivers basically required for connecting hardware with computer software to function perfectly. You will get a blue screen with the message “Your PC ran into a problem and needs to restart. We’re just collecting some error info, and then we’ll restart for you”.
What Does System Thread Exception Not Handled Mean
The error code of system thread exception not handled error in windows 10 is sometimes 0x0000007E or 0x1000007E. They show that a system thread generated an exception that the error handler did not catch. And the exceptions are many. Sometimes thread stuck in the device driver or maybe you will see errors such as error of faulty file’s name like nvlddmkm.sys, netwtw04.sys, netwtw06.sys failed error, netio.sys, ivrs64.sys, nwifi.sys, atikmdag.sys, fltmgr.sys, wdiwifi.sys, aswbidsdriver.sys, igdkmd64.sys, CMUDA.sys, KMODE Exception, system_thread_exception_not_handled ntoskrnl.exe, etc. however, sometimes if you are lucky it will automatically repair itself, start the full Windows operating system, and power on Windows OS normally, but in most cases, you must have to fix it manually. The blue screen error will appear there permanently, or you face a restart loop.
Ways To Fix System Thread Exception Not Handled Error
This BSOD error has many reasons, it is first and recommended is start investigating the minidump file which is responsible for logging the crashes and we can almost get the exact reason which is causing System Thread Exception Not Handled Error Blue Screen of death (BSOD). To fix this issue on Windows 10/8.1/8 OS, you have to follow these steps.
Solution 1. Investigate The Minidump files
BSOD Error Code: system_thread_exception_not_handled can be fixed by analyzing minidump files. You will see all the logs and crashes report in minidump files. This will help you to understand why SYSTEM THREAD EXCEPTION BSOD is happening. To analyze minidump files follow these steps on your Windows computer.
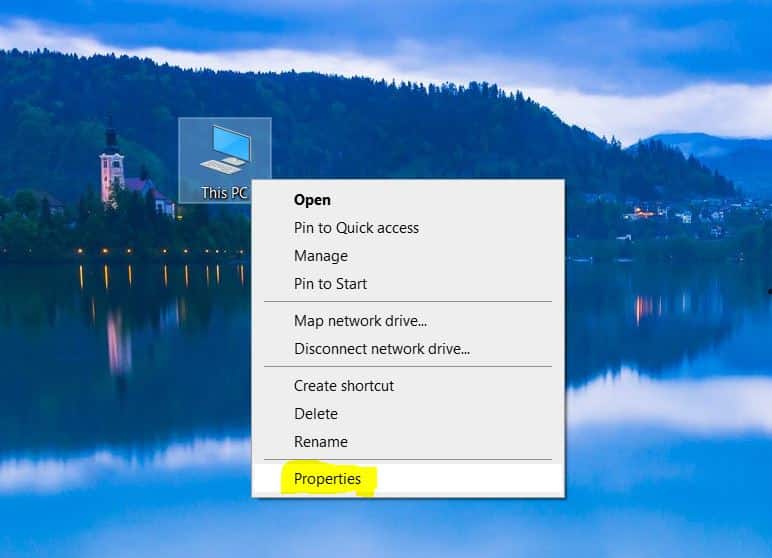
- Go on Windows Desktop and Right Click on This PC, Then click on Properties.
- Click On Advanced System Settings.

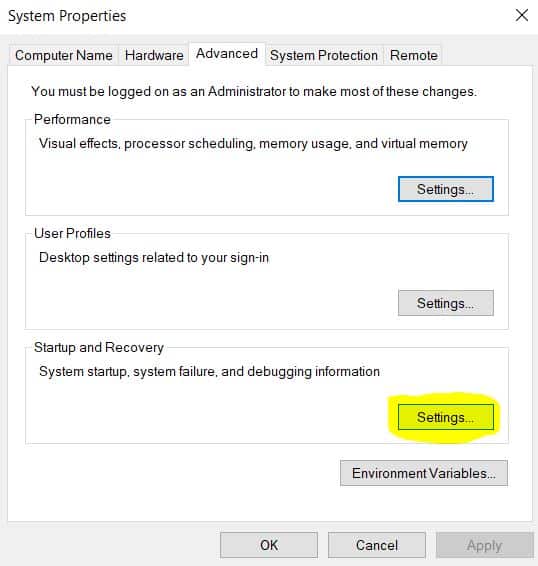
- Now click on Advanced, then click on Settings in Startup and Recovery Column.
- Here you will see the Startup and Recovery settings screen.
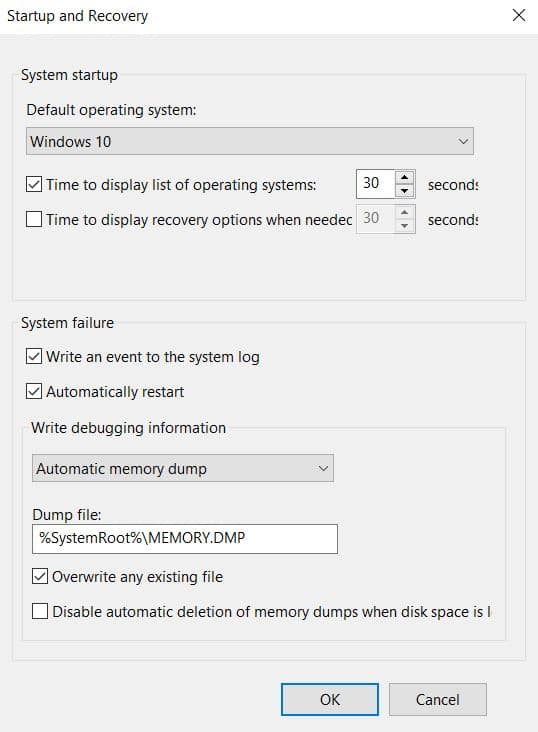
In the settings, you will see the two very important checkboxes in system failure Colum Write an event to the system log, and Automatically restart. By default, these boxes are already ticked so in case these settings are not ticked, then you have to tick the first box to write the event log in the system and the second for restarting the computer when these errors occur.
Here are Some Important things to Know
- Write an event to the system log function works for writing windows computer error logs in the system. In the fresh Windows 10 OS installation, you will find this feature already on by Microsoft. However, if you want this feature then you have just written the command below to your Windows 10 Computer command prompt. After clicking on the enter button on your computer this feature starts logging error events in the system.
wmic recoveros set WriteToSystemLog = False
- In case your Windows Computer occurs BSOD( Blue Screen of Death) or system thread exception not handled the error, Automatically restart feature will help you get your computer back to normal. This option is also by default enabled in Microsoft Windows 10 computers. However, here is a one-line command if you want to enable it manually.
wmic recoveros set AutoReboot = False
- And the third option is to Send an administrative alert. This option is designed for alerting administrators if any system error occurred. Windows 10 comes with this option enabled by default. So don’t worry about receiving an error alert if something bad is happening with your Windows computer. Here is a command if you want to disable this feature.
wmic recoveros set SendAdminAlert = False
Type of Write debugging information
You will get confused if you are viewing the write debugging option because it has 5 types of recording crash dump information option to select for the dump. So I have written a small summary of these 5 options below.
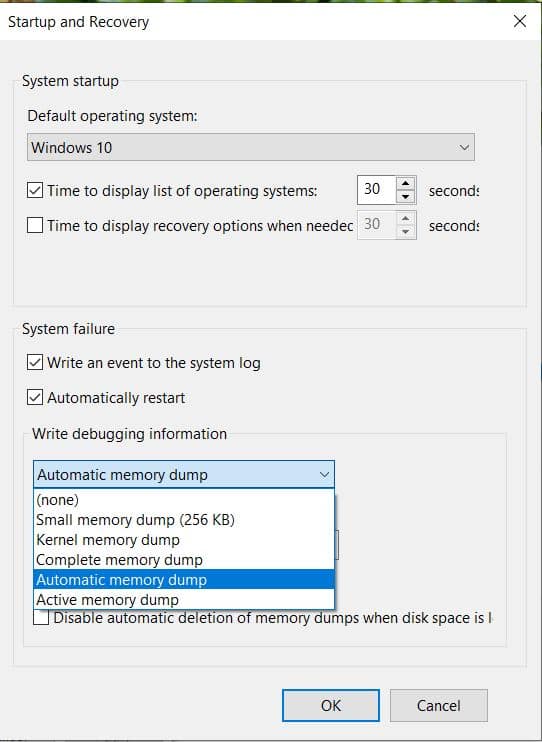
- Small memory dump (256 KB)
This debugging option dumps the very small size of error information. Here is a list of information you will get.
This dump file includes the following:
- The bug inspection message and parameters, as well as additional blue-screen info.
- The processor context (PRCB) for the processor that crashed.
- The method data and kernel context (EPROCESS) for the process that crashed.
- The thread data and kernel context (ETHREAD) for the thread that crashed.
- The kernel-mode call stack for the thread that crashed. If this is larger than 16 KB, only the highest 16 KB will be included.
- A list of loaded drivers.
Read all the information on Small Memory Dump on Microsoft Documentation.
- Kernel Memory Dump
A Kernel Memory Dump contains all the data related to memory in use by the kernel at the time of the crash. This type of dump file is small in size as compared to the Complete Memory Dump. Normally the data of the dump file will be around one-third the size of the physical memory on the computer. This size will differ considerably, depending on your conditions. Get all the details of this Kernel Memory Dump here.
- Complete Memory Dump
This Dump file is large as compared with all other dump files. It has complete dump data and you will see a large amount of data in the file. This file covers all of the physical memory that is utilized by the Windows computer. A complete memory dump does not, by default, include physical memory that is applied by the platform firmware. Here is the Official Complete Memory Dump Documentation on the Microsoft website.
Read Full Docs.
- Automatic Memory Dump
By default, you will see this option is set by Microsoft Windows. An Automatic Memory Dump includes similar data as a Kernel Memory Dump. The difference between the two is not in the dump file itself, but in the way that Windows Computer sets the size of the system paging data.
If the Computer paging file size is set to System managed size, and the kernel-mode crash report includes an Automatic Memory Dump, then a Windows computer can set the size of the paging file to shorter than the size of RAM. In this condition, Windows computers set the size of the paging file high to secure that a kernel memory dump can be saved most of the time. Read more about Automatic Memory Dump.
- Active Memory Dump
The last option is the Active Memory Dump which is the same as a complete memory dump. But it separates out pages that are not expected to be relevant to troubleshooting errors on the system host machine. Because of this filtering, it is significantly less than a complete memory dump. Detailed Information on Active Memory Dump here.
In all these options we recommended you use the small memory dump because it contains all the important information and is smaller in file size. To solve this we are using a small memory dump option to read and open the minidump file properly in this article.
How to Create Small Memory Dump/Minidump
Practically you don’t have to create a small memory dump file. Windows computers automatically create for you. You only have to select the Small Memory Dump (256 KB) option in settings and click ok to save the setting. so now windows create a small memory dump or minidump.
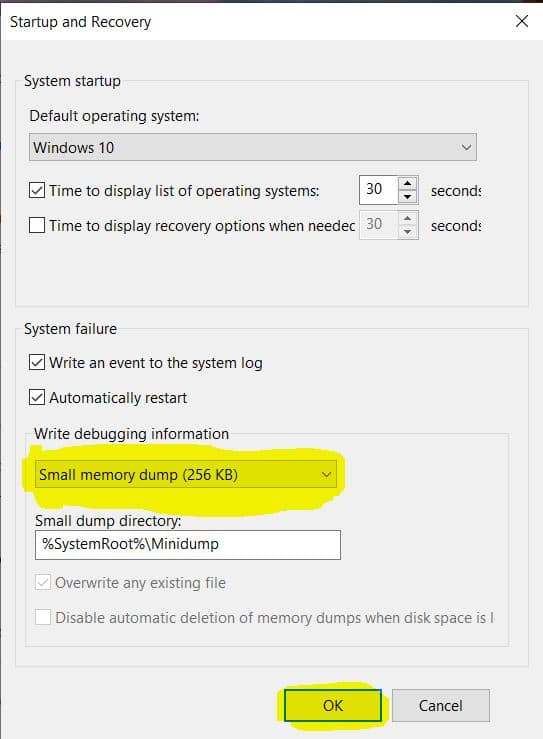
The minidump file location on a Windows computer is %SystemRoot%\Minidump by default. This means you can locate the dump file in C:\Windows\Minidump. But, You can modify it if you want.
How to Read and Analyze Minidump File
You already got a minidump file so now it’s time to read and analyze the minidump file. So, It will save all memory-related data on one file when you will get a blue screen error. But, After that, What will you do to read and analyze it? How will you know what is creating the problem? It’s actually quite easy process.

- Download the BlueScreen Viewer to a Small Memory Dump File.
Here is a freeware software developed by NirSoft. They have a bluescreen viewer software which is designed for easy to use and free for use. “BlueScreen Viewer Software” that can read and analyze the small memory dump file. Here is the Download Link.
- Now unzip the file and double click to open it.
You can download WinZip if you don’t have any zip file opener tool in Windows
Computer.
- Open Minidump file in BlueScreen Viewer software.
When you initiate a minidump file in a bluescreen viewer, it will give you a host of basic data. You will find the error files highlighted which have caused the last blue screen of death errors. Now find those drivers and fix by reinstalling or updating.
Solution 2. Fix a file name attached to the error code
In some cases, there is an error file name attached to System Thread Exception Not Handled BSOD Error in Windows 10. by file name, you can track which driver is causing the error. So you can repair that device driver by reinstalling or updating and you will be able to resolve the error completely. Here is a common file that shows on the Blue Screen of Death (BSOD) Screen.
- nvlddmkm.sys – This video tdr failure nvlddmkm.sys error file related to Nvidia Display Driver and mostly comes when you are playing games or watching HD Videos. To fix this issue you have to uninstall the old driver then download the latest driver from Nvidia website and install it in your Windows Computer.
- netwtw04.sys or netwtw04.sys – This error belongs to the Network Adapter/WIFI driver. So you have to update your network adapter and wifi driver to the latest version. First, identify your driver company and you can also reinstall those drivers. Here are lists of popular Network Adapter/WiFi Driver Providers download Page.
Download From Official Website
- netio.sys – IRQL_NOT_LESS_EQUAL, SYSTEM_SERVICE_EXCEPTION, KMODE_EXCEPTION_UNHANDLED and PAGE_ERROR_IN_NON_STORED_AREA occurs when netio.sys file has error. Here is good article by windowsbulletin to fix this issue.
- Ivrs64.sys – This is a Logitech Camera driver error. To fix this you have to uninstall Logitech webcam driver and install the latest version of the software from the Logitech website.
- nwifi.sys – VirtualBox is causing issues if you are getting nwifi.sys file name System Thread Exception Not Handled BSOD Error in Windows 10. Please uninstall VirtualBox from the computer to fix this error.
- atikmdag.sys – This is an AMD ATI Radeon graphics card driver error. To fix this issue, you have to uninstall the ATI Radeon graphics driver and install a fresh version of the ATI Radeon display from the official website.
- fltmgr.sys – This error is a software component of Microsoft Windows. Microsoft Filesystem Filter Manager ensures all files installed on the user PC are stored in their original directories. fltmgr.sys is a file associated with the Microsoft Filesystem Filter Manager and if you get a BSOD screen with this file name, then you have to repair your Computer.
- wdifi.sys – To fix this issue you have to update your Windows 10 operating system or install a Latest copy of Windows 10 OS in Your Computer.
- aswbidsdriver.sys – If you are getting this error, then your Windows10 OS is corrupted. Install new updated Windows 10 OS on your computer.
- Igdkmd64.sys – This is the Intel graphics driver issue. Uninstall Intel graphics driver and download intel graphic driver for installing in Windows PC.
Download Link
- CMUDA.sys – Audio device driver is causing this error. Fix the audio driver issue to get rid of this BSOD error.
- system_thread_exception_not_handled ntoskrnl.exe – here is an official guideline from Microsoft Team to fix this issue. “Ntoskrnl.exe (Short for Windows NT operating system kernel,) also known as kernel image, provides the kernel and executive layers of the Windows NT kernel space and is responsible for various system services such as hardware virtualization, process, and memory management, thus making it a fundamental part of the system” – Microsoft.
If you have any of the above-listed file names when the error comes on BSOD Screen, then you need to uninstall it and reinstall it or update the driver. However, If you have a different system file attached with the error code, you will need to search up the driver file name online to find out which driver is having an issue.
Solution 3. Reinstall Display Drivers
To solve the BSOD “SYSTEM THREAD EXCEPTION NOT HANDLED” error puzzle, on Windows 10/8/8.1 OS, must be required to reinstall or update the display drivers. Because in most cases the Blue Screen of Death error occurred by Graphics Card or Other Display Drivers. To do that we have to boot Windows PC into Safe mode.
Step 1: Boot into Safe Mode
- Hold Down the Shift Key on Keyboard and go to Power then Right-Click on Restart

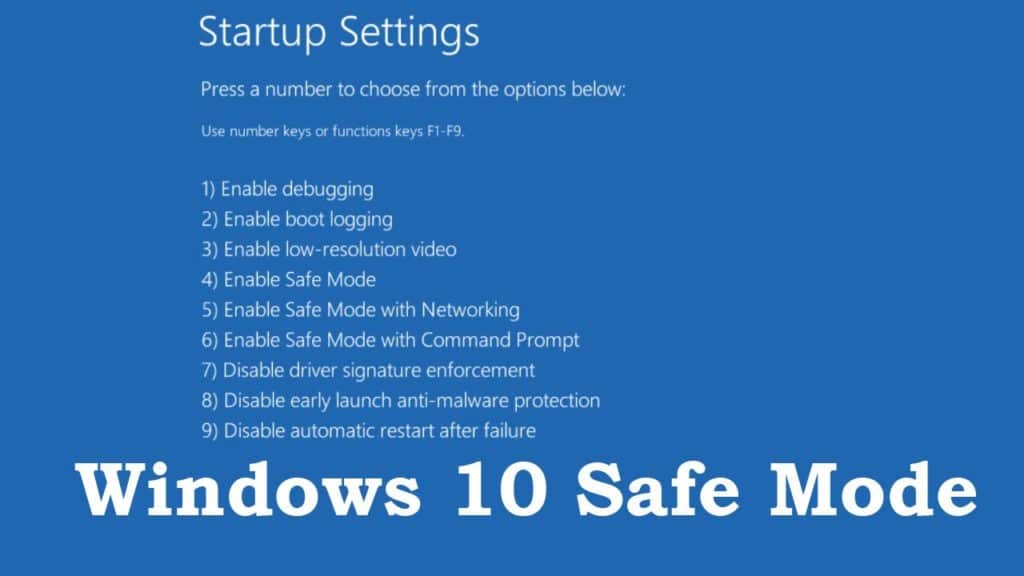
- After Restart, Then you will see the troubleshoot screen. Now go to Troubleshoot > Advanced Options > Startup Settings.

- Now Click Restart Button.
- On the next screen, Press the 4 Key on the keyboard to boot in Safe Mode
Step 2: Uninstall Display Drivers
Hold Down Windows Key plus R Key. This will open a running program on your computer. Now type devmgmt.msc and press Enter.

On the next screen, you will see the Device Manager. In the list of devices, find Display adapters and double-click on it. Under it you see a graphic driver installed on a windows computer. Left-click on it and first update the driver.
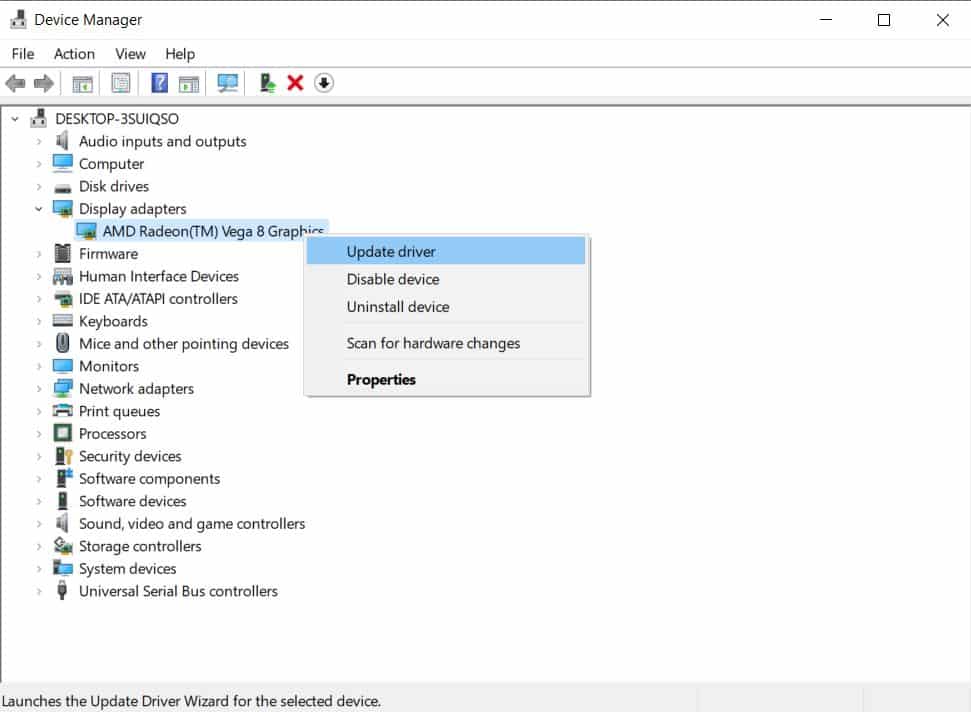
Connect to the internet if you are still not connected, then click Search automatically for updated driver software.
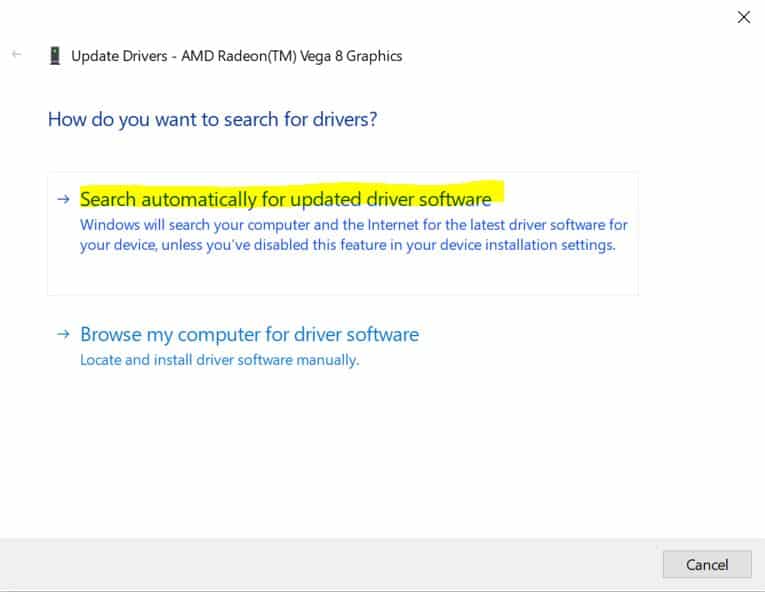
Now Windows will start searching for updated drivers.
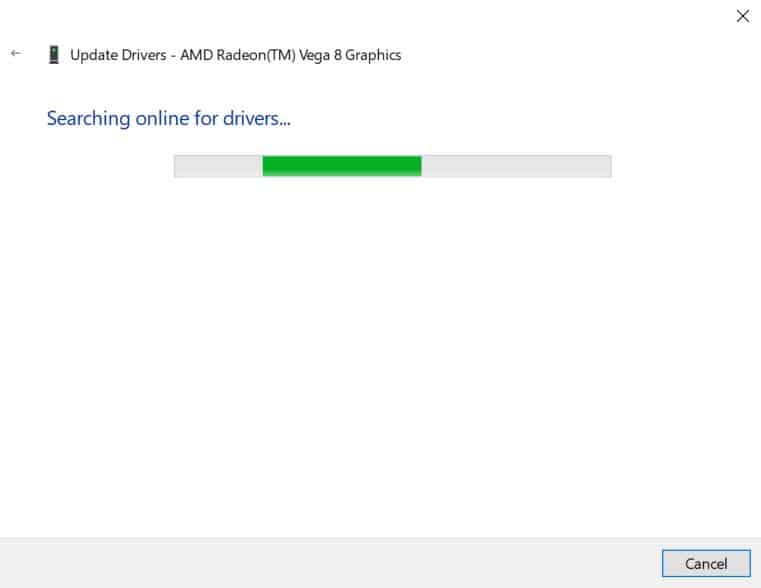
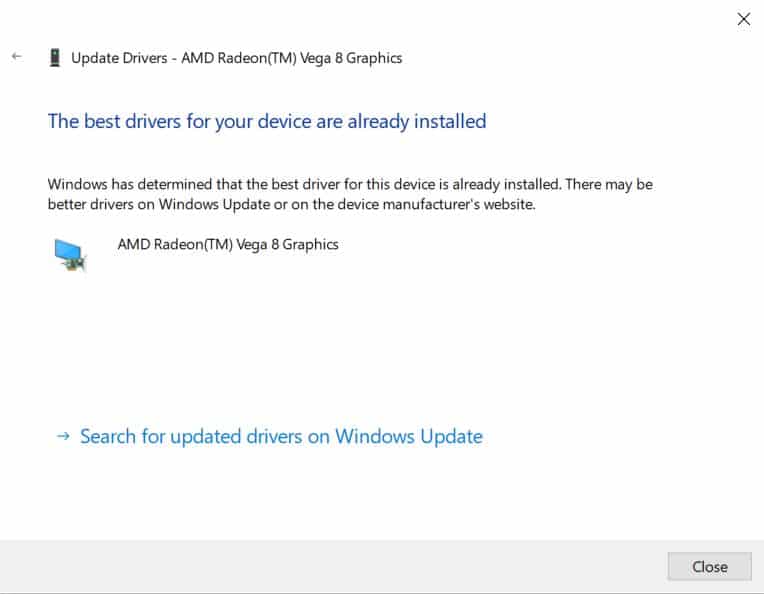
If drivers are updated, then you will get a message on-screen “The best drivers for your device are already installed”. If your display driver is old then it will start downloading updated display drivers files and install them on the computer automatically.
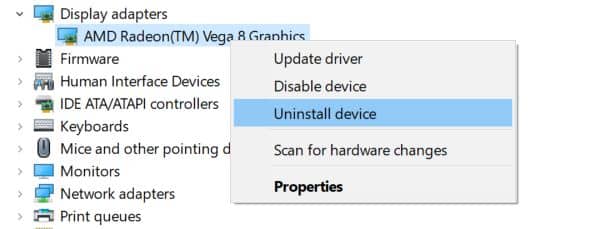
However, if your problem is fixed by updating Display Drivers, then you can quit here. If you are still facing the System Thread Exception Not Handled error, then try to uninstall the Display Driver and Restart Your Windows Computer to Normal Mode. if you have a faulty driver installed on your PC then this error will be fixed
Step 3: Install the Latest Display Drivers
Download the latest driver from the official website. After downloading install it on your Windows PC. To get an updated version of drivers for your graphic card, visit your graphic card manufacturer’s website.
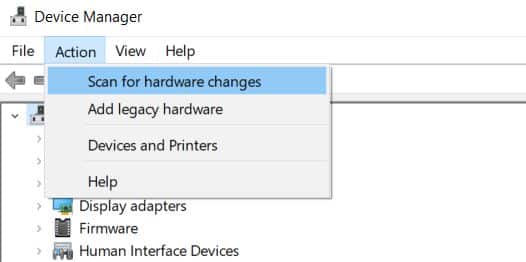
To Install Drivers Automatically, go to the Device Manager by following an earlier step. Now click on Action Menu, then Scan for hardware changes.
Note: if you’re downloading drivers from the official website, then check your OS details before downloading. This will help you in downloading compatible software for your PC.
Solution 4. Uninstall and Install the Sound card driver
In some cases, this error message was caused by C-Media Audio USB Audio Class 1.0 and 2.0 DAC WDM Driver. To fix this faulty driver or incompatible driver issue you have to uninstall the sound card driver from your Windows PC. After that Device Manager automatically installs the default sound driver on your computer. Here is the complete process for uninstalling the sound card driver from your PC.
- Go to Windows Desktop and right-click on This PC, then click on Properties.

- At the next screen, click on the Device Manager option

- In Device Manager, expand the section “Sound, video and game controllers“. Below this category, right-click on anything similar to C-Media USB Audio Class 1.0 and 2.0 DAC Device Driver. A setting menu will pop up. Then choose the Uninstall device option in the list.

- After clicking on Uninstall Device you may be asked to confirm the uninstallation. Follow all steps until the device is completely uninstalled.
- Now restart your PC for the change to take effect. After that, your Windows Computer will attempt to reinstall the sound card driver and maybe replace it with the manufacturer driver. If Windows does automatically install the again, select Action and click on the Scan for hardware changes option.
Solution 5. Reset Your PC
Resetting your Windows 10 Computer to default settings is supposed to be the last hope for this problem but it is surely effective and it’s able to fix most of the BSOD issues, including the one reported in this article. Here’s how to reset your computer in Windows 10 OS.
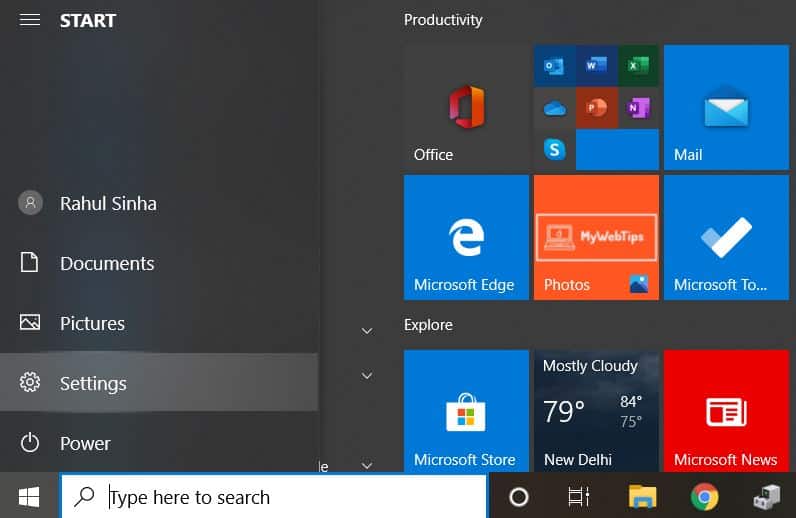
- Press the Windows key on the keyboard and click on settings
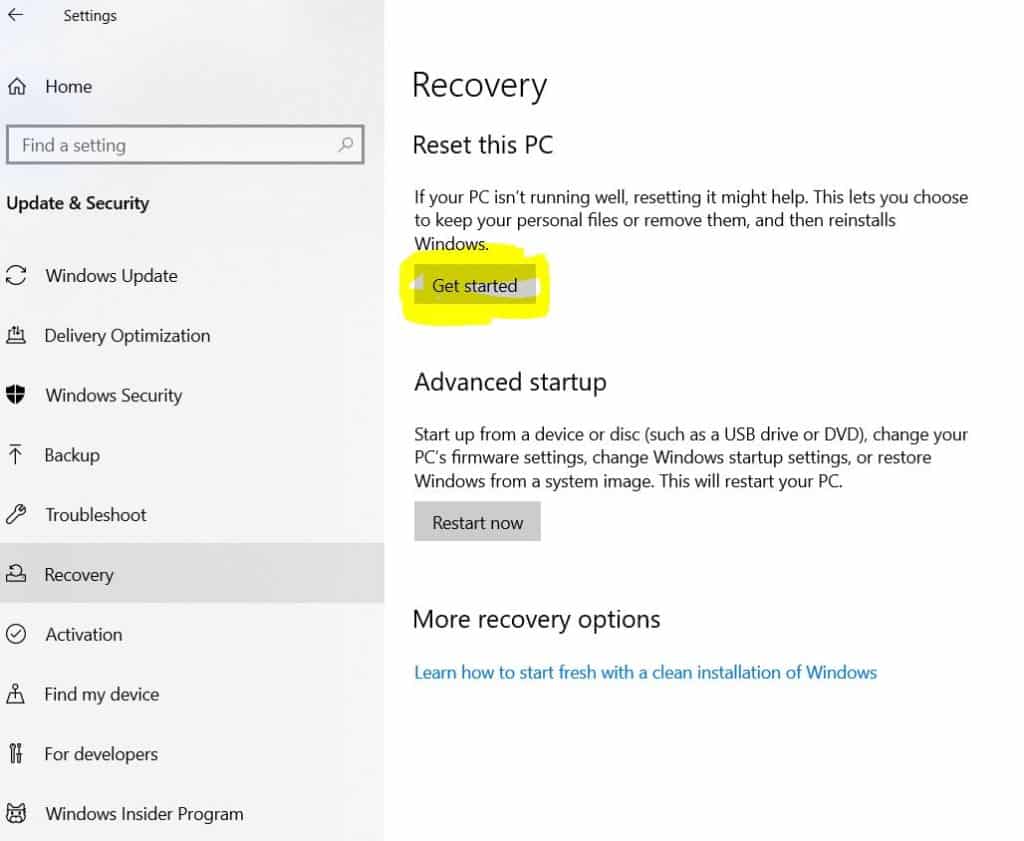
- On the next screen, click on Update & Security.

- Now go to the Recovery menu then click on Get Started button below Reset This PC Option.
- Click on the “Keep my files” or “Remove everything,” option depending on your need. if you want to keep your data files on a PC, Then Choose to Keep My Files. this way, all of your settings will turn to their defaults, and all manually installed apps will be uninstalled.
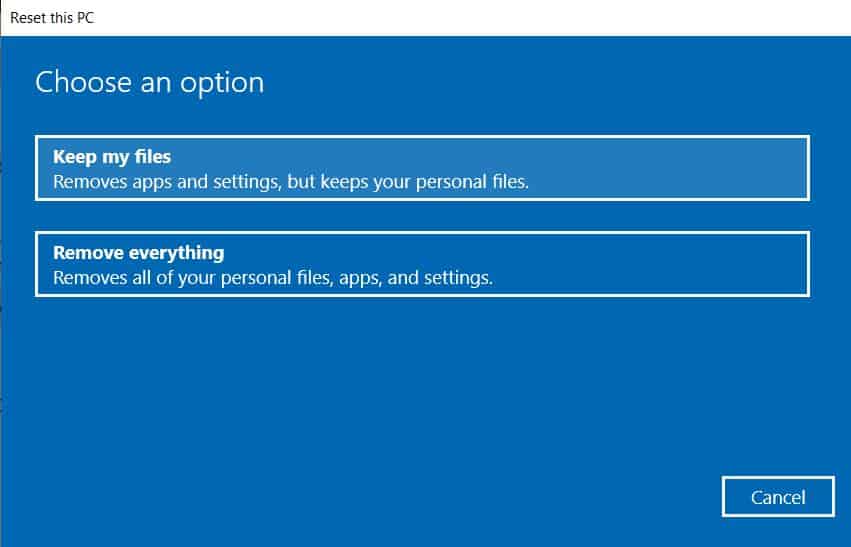
Decide “Just remove my files” or “Remove files and wipe the drive” if you wanted to “remove everything” in the prior step. Erasing the drive becomes a lot longer but will make sure that, if you are giving the computer away, you will have a hard time recovering your deleted files. If you are keeping the computer clean and don’t need files in drives, choose “Remove Everything”. you can also try system restore.
Solution 6. Clean Installation of Windows 10 OS
I know this is not a solution but If the above methods can’t solve system thread exceptions not handled in Windows 10, then you have no choice. you can try a clean reinstallation of Windows 10 OS to fix it. Many users report that they have successfully solved the system thread exceptions and not handled errors through this method.
Now you can initiate the boot order in BIOS to perform the computer boot up from the new system disk.
If you want to save the other drive data, then surely you can save other computer drive data by not deleting or formatting other drives such as D, E, etc.
- Interview Tips for Landing Your Dream Digital Marketing Job
- Mastering the Markets: A Comprehensive Guide to the Top 10 TradingView Indicators
- How To Improve Business Productivity With Image to Text Technology
- Roman numeral translator app for converting to different numeral systems
- Elementor Plugin: Tips for Creating a Beautiful and User-friendly Navigation Menu
Bottom Line
If you still have an issue in fixing the System Thread Exception Not Handled Error in Windows 10 which shows on a Blue Screen of Death (BSOD), then write in the comment section below for help. And if you have any advice or better methods, you leave them in the comment section. We surely update this article according to your fix.
Browse for new error fixes.

Method 5 worked for me.
Good to hear you solved this issue.